Nautical Outdoor Lighting Roundup

When Jerm and I started looking for lighting, we knew we wanted something with a nautical/industrial style, but we did not want to spend a small fortune. Since we were planning on putting a larger light on either side of the shop door and three smaller lights over the parking side door — 5 lights total — we had to keep our cost-per-light down.  After admiring the likes of Barn Light Electric where lights start around $175 each, I reluctantly pulled myself away and put together a roundup of fairly reasonable nautical-styled lights.  You can click directly on each light to link to the product’s page, or you can follow the links down below.


1// This light is definitely a splurge at $200, but it was actually salvaged off a ship. Big Ship Salvage takes original ships’ lights and revamps them to meet current electrical standards. I particularly love the mix of copper and brass.

2// This is probably the least “nautical” of the bunch, but at just over $41 each, it would have been a very reasonable option for an 11″ tall light. It is very similar in shape to the Wheeler lights from Barn Light Electric — but at about $175 less.

3// I ran across this light on amazon, and loved the metal cage around the bulb. The best part was that it came in a 12″ tall size for $74 and a 8″ tall size for $53.

4// When I first ran across this light on home depot’s site, it seemed like a steal at $30. However, after reading several reviews about problems with rust, we decided to pass.

5// and 6// actually belong to the same collection. They are the Kichler nautical light in 7-1/2″ and the coordinating Kichler light in 12″. At $55 and $73, they are decently priced and have the cage I like.

7// Last but not least, is this cage light from Menards. At just under $12, it is a great deal! We bought several to use on the inside of the garage.

Hopefully this will help someone else in their search for the perfect nautical light. I’ll be back to share which lights we ended up with and how we installed them soon!

Image Map

The Dormers are Done (and how our dog jumped out the window)

After painting most of the garage, it was time to finish up the dormers. We had been waiting for our windows to come in, and it was nice to put the finishing touch on the exterior. Luckily for us, Jerm’s dad and brother own a glass and window company, so we were able to get nice windows at a great price.

2012-06-23_18-15-56_908

It’s not obvious from the front pictures, but our garage has an identical dormer facing the back as well. Our plan was to put my desk and work area in the front dormer and build in a window seat/daybed into the back dormer.

IMG_7334

We wanted lots of windows to let in lots of natural light. The main windows in each dormer consist of two double-hungs on each side with a thermopane in the middle. The three windows installed as one unit. After we had them installed, we measured the top triangular section to order custom piece of glass.

Here is the front dormer with the glass installed. I like that I will have a view to the street from my desk.

2013-01-11_11-33-52_491
The back dormer is facing an alley (and Dunkin Donut’s drive through). Not an ocean view, but it is still nice to have the light.

2013-01-11_11-33-34_950
After the windows went in, all that was left to do was to finish siding and painting the dormers.

IMG_8389
When we first started working on the dormer windows, our dog Zulu liked to stand up and look out the opening with us. While I was at work, Jerm was working on the side of the dormer with scaffolding set up outside the opening. Zulu was chilling in the loft making a flight plan.  As Jerm was coming down the roof to climb back inside, our crazy (100 lb!) dog decided that he was lonely and wanted to be outside and proceeded to take a running leap out of the dormer opening. Meaning Jerm came around the corner of the dormer,  and our dog came flying out the window. Thankfully Jerm was able to somehow catch him and throw him back inside — without being knocked off the scaffolding himself. Everything was ok, but needless to say, Zulu was not allowed around open upstairs windows anymore — and the people who run the drive through at Dunkin Donuts think we are nuts.

IMG_20120623_234410


Picking a color (is hard)

When it comes to our projects, Jerm and I are normally decisive people, but this was definitely not the case for picking the exterior color for the garage — and what will later be the color of our house. I think there is just something about picking a color that a) will be on display for the whole world to see and b) will take days to paint that makes you think really long and hard about what you want.

2012-06-02_15-34-50_197

I think Jerm looks like the grinch here. Seriously though… It took us over a month to decide on a color!

We knew we didn’t want your average cookie cutter suburban house color — pale yellow anyone? No? How about pastel blue? We liked the idea of a darker color that would contrast our white trim. At one point we considered a darker burnt orange color, but we also had to take into account the fact that our neighbor’s house was “number 2 pencil yellow” and orange next to their yellow might look crazy-town.

The other obstacle was that we had to hurry up and roof the garage earlier in the winter, so we now had to make sure the paint went with our existing roof (which was called “weathered wood”).

Our first color inspiration came from one of Jerm’s coffee mugs and this picture we found. We liked the color of the mug and thought it would look good in contrast with the white trim. We found that it was very close to BM Silhouette. However, after looking at it in a bunch of different lights, we worried it would read too purple-y — and we really did not want to be the people with the (accidentally) purple house.

Coffee Mug - BM Silhouette color inspiration

Even though “Silhouette” didn’t work out, it got us looking in the right direction. Our go-to painting resource is our affinity color deck.  The Affinity Colors are a collection of 144 neutrals that all pair well with other colors in the collection. You really can’t pick a bad color, and it is helpful in creating a cohesive color scheme. We actually had picked several of our interior colors from this fan deck, so we started looking through it for the garage.

The most helpful thing was to have a friend slowly flip through the color deck while holding it out the upstairs window next to the roof line. We would have him flag any color that looked decent, and we slowly narrowed it down. In the end we were left with three — BM Sparrow, BM Flint, and BM Boreal Forest. We quickly eliminated Boreal Forest as being too green.  Sparrow was like a lighter, less purple, version of Silhouette, so we bought a sample to try, but ultimately we decided on Flint.

Garage Paint Color Options
We had it mixed in Benjamin Moore Aura exterior paint in low lustre to contrast our white semi-gloss trim. The best part of using Aura was that it covered in one coat!! It was such a relief to not have to put a second coat on the garage.

2012-06-23_18-15-56_908

All in all, the painting took about a solid week. Since we both work during the day, most of our painting was done at night. Even though we had to cover such a large area, we found it easiest to use brushes rather than rollers. It was easier to get in the spaces between the siding boards, and it was easier to get in all of the texture on the siding.

Painting the Siding

Next step is just to finish the detail and windows on the dormers, and get to work on the driveway!

Siding the Garage: Fiber Cement vs. LP Smartside

There are a lot of siding choices on the market today, so it took us a while to sort through all of them and choose one for our garage (and eventually our house).  New vinyl siding can be done nicely and is pretty standard for our area, but we wanted to do something with a more authentic look. We also didn’t want to be limited to only the colors that vinyl siding comes in.

Our house was built in 1924. Currently we have 3 layers of siding. On the inside is a lap wood siding that would look so cool restored to its original glory… we just don’t want to deal with the high maintenance that comes with wood siding. Next is a layer of some fiberboard siding with who knows what in it (hopefully not asbestos). Finally, our house if capped off with a layer of aluminum siding that has seen better days. As I mentioned, we liked the idea of siding that looked like wood, but without the maintenance.

House Siding LayersAluminum Siding

Told you it is bad! Eek. I can’t wait until we can re-side the house.

After a lot of research, we eventually narrowed it down to two choices: Fiber Cement and LP Smartside. Here are the pros and cons of each:

Fiber Cement

Pros
1// Gave us that wood look we were going for.
2// Durable in most cases (very moisture resistant, fire resistant, etc.)
3// Can be painted in any color and doesn’t expand/contract like wood so the paint stays put.
4// Carries a 30 year limited warranty
5// Comes in several style options like vertical panels, shakes, etc.

Cons
1// Requires special tools to cut. You’ll also want to have protection from breathing in silica particles released when cutting.
2// Heavier.. Harder for Jerm and I to lug up a ladder.
3// Not as resistant to impact — Can break or crack.

LP Smartside

Pros
1// Gave us that wood look we were going for.
2// Impact and moisture resistant.
3// Can be painted in any color.
4// Carries a 50 year limited warranty and a 5 year full warranty (better than Fiber Cement)
5// Comes in several style options like vertical panels, shakes, etc and has matching soffit/trim.
6// We can cut it with a regular saw and it is easier to maneuver on a ladder.

Cons
1// Since it can expand, you need to leave a small gap where two pieces butt end to end. This means you have to go back and caulk all the gaps, which is more labor intensive.
2// Since it is made up of wood, it can burn.

In the end, we wound up going with the LP smartside, which we purchased pre-primed from Menards.

Here it is in all of its beige glory!

Siding is up

As far as installation went, it was pretty straightforward. Jerm began by trimming out the garage in the coordinating LP Smartside trim, and then we got started on the fun part. Once we nailed on the bottom two rows of siding, we used this super handy tool to help us position every row above it.  It is the PacTool Gecko Gauge, and we found it for about $70 on Amazon. First, it lets you set your “lap” or how much overlap you are leaving between the rows of siding. Then, you snap it onto your existing top row of siding.  Finally,  you can set your next row of siding into the grooves to hold it in place while you nail. I didn’t take any pictures of this, but here is one from the manufacturer’s site.

Gecko Gauge

We really wanted to add some kind of architectural detail in the tall peak. We debated board and batten, but ultimately decided on shakes. LP makes a random “cedar style” shake out of smartside, so we special ordered it from Menards.

Shakes are up

One funny story from siding the garage. Do you see our neighbor’s “no. 2 pencil yellow” garage peeking out on the right? Their house and garage were originally red. Last year we came home from Florida to find it painted this awful color. While we were starting to paint our new siding, the neighbor came out and said “Why are you painting it? I like that color” We explained that the beige was only primer. As it turns out, he thought that the color he picked was beige — just like our primed siding — and didn’t realize it was yellow until half of his house was painted….

Insulating

I know you’ve all been waiting anxiously for this post ever since I mentioned insulation here. When it came to building our garage, insulation was very important to Jerm and myself. Jerm cared about being able to easily heat and cool the garage.. and I just didn’t want to be cold. We put in the initial investment, and it sure has come in handy. Especially in the last couple days, as it has been well into the negative temperatures here.

Here is a run-down on what we did.

1// Foil faced OSB rather than regular OSB for sheathing the roof.

And no, it isn’t just to make your garage very shiny. I thought we would be blinded looking at it, but Jerm informed me that it is installed so that the foil faces inward. This step helps more with the cooling as the foil provides a radiant heat barrier and reflects up to 97% of the radiant heat. This was important because Jerm wanted to use a smaller room air conditioner unit to cool the whole garage, and we needed to give the little guy the best chance at success.
The prices on lumber can fluctuate so much. When we purchased, we were only looking at about a $5 per 4’x8′ sheet difference.

2// Foil faced foam for insulating on the outside walls.

This kills three birds with one (rather expensive) stone. The foil face provides another radiant heat barrier to keep cooling costs lower, an inch of foam provides R-6.5 insulating value, and when you seal it all up with a foil tape, it takes the place of a “house wrap.”

Foil faced foam is up :: Insulating the garage

3// Good garage doors with an R value

Thanks to Jerm’s dad being in the door business, we were able to get these garage doors for a very good deal. They have an R value of 16.55 and have a thermal break so that they don’t transfer heat out or cold in. As a bonus they had that bead-board panel look that matched the style we were going for. Pretty and functional!

4// Rolls of insulation, white polystyrene foam, Great Stuff

We used R-19 Kraft faced insulation in between the studs of the walls, and Jerm stapled it all in to seal it up. We lined in between the rafters with the R-8 white polystyrene foam, filled in the gaps with Great stuff, an then covered it with unfaced R-30 insulation. Nothing too exciting… Here is an idea of how it all went together before we drywalled.

2012-07-17_23-45-14_953
And the drywall going up on top of it all. Please ignore our sweet cable railing for now. I will be back with more info on that soon. The details in this garage are the best part.

Drywalling the garage

We saved a bunch of money by buying it all when Mernards was running both a mail in rebate and their 11% rebate. You can combine the two, and we saved a couple hundred dollars. Our basement looked like this until we were ready to use it all.

Insulation
So there you go! A guide to having the best insulated garage on the block. Unfortunately we can’t take advantage of any tax credits for this since it isn’t our residence, but we hope to update our house’s insulation when we redo the exterior this spring.

DIY Baby Blocks

Wow.. It’s been a while since I’ve written here! Hopefully I can make it a more frequent occurrence.

The most exciting bit of news since I last posted is that I’m going to be an aunt– for the first time! My husband’s brother and his wife are having their first baby, and they are due April 2. To help the time go by faster (for myself and my sister-in-law), I decided to give her a baby gift every month up until the baby is born. Since she is due on the 2nd, I have been bringing the gifts over on the 2nd of each month and leaving them at their door to surprise them.

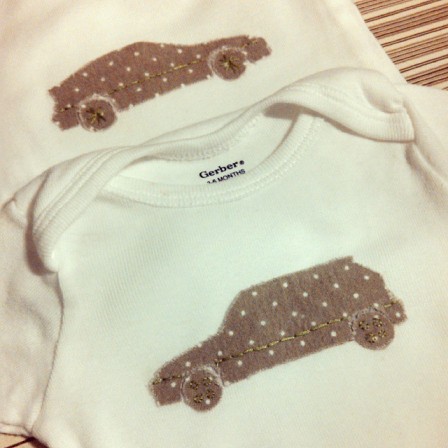
In October, I was lazy and brought them a Sophie the Giraffe. Thankfully my dog didn’t get to it first, because he got mighty excited every time we squeaked it. For November, I really wanted to give them something handmade. After lots of “pinteresting,” I settled on some DIY onesies with my brother-in-law’s cars on them. As a family, we are really into cars. I “race” for run and Jerm and his brother race for reals. One of his cars was even featured in Super Street magazine.

I figured since they were such specific and meaningful cars, the onesies could still work fine for a girl. (They know what they are having, but haven’t told.) I was hoping to machine applique the car outlines on, but I couldn’t figure out how to get the onesies over my sewing machine arm and stitch all the way around a car… Fusible webbing to the rescue! Add in a little bit of hand stitching for details, and you have a 1987 Honda CRX and a 1990 Civic Hatch – with phone dial rims just like the ones on my hatch =). Baby’s got the coolest auntie! Since they aren’t stitched on, the edges frayed a little bit in the wash, but I think it adds to the charm.

DIY EF Onesies
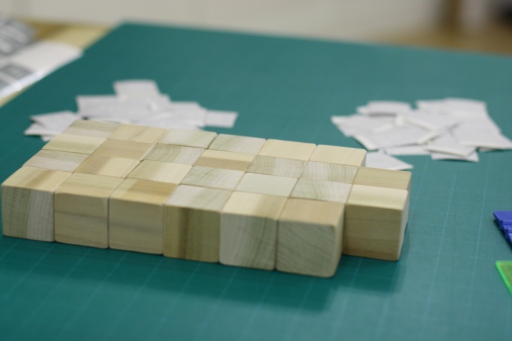
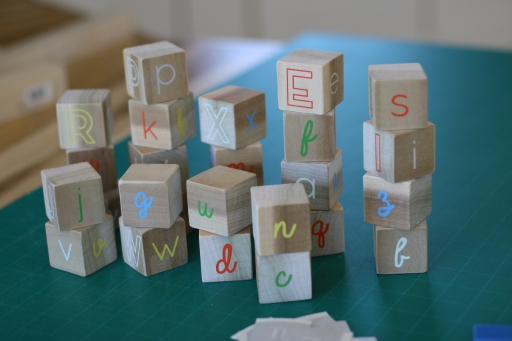
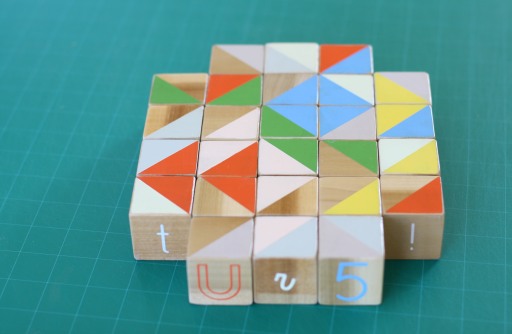
Next up for the December gift is DIY Baby Blocks – not the plastic ones you can buy today – real old school wooden ones like I played with as a kid. This project didn’t cost anything as I already had all the materials on hand.

Here is what I used:

1 – 4’ Length of 2×2 Poplar cut into 26 blocks (and for reasons not understood by me, 2×2 is 1.5” x 1.5”)

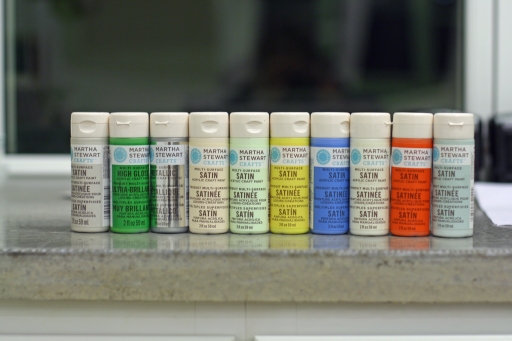
Martha Stewart Acrylic Paints.  I used –from left to right– Lake Fog, Scottish Highlands, Sterling, Porcelain Doll, Artichoke, Yellowjacket, Blue Calico, Summer Linen,  Geranium, and Cloud.

Martha Stewart Acrylic Paints

Clear, water-based polyurethane

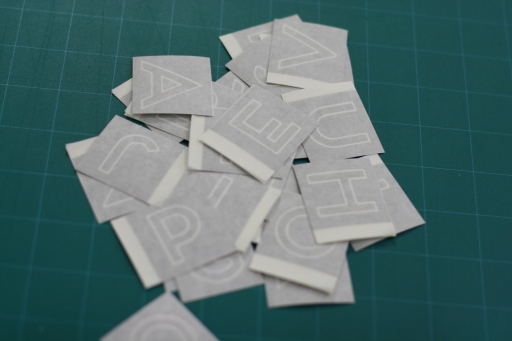
Vinyl “Stencils” that I designed and cut :: Edited to add, I now have sets of these stencils up in my etsy shop here if you want to make some blocks of your own!

Vinyl Stencils for DIY Alphabet Blocks
Frog Tape

Now, if you don’t have an extra 2 hours on your hands, or blister proof thumbs, you may want to invest in pre-cut and sanded blocks like these from various etsy sellers.

I had asked for a palm sander for Christmas, and Jerm was nice enough to let me buy it early to work on this project. He cut the wood into 1.5” lengths with the chop saw, and I took over sanding each side and knocking down the corners and edges with the sander. I used 220 grit sandpaper since the wood was already pretty smooth. 2 hours and 2 blisters later, I had 26 blocks ready to be painted.
DIY Painted Alphabet Blocks

I had drawn up “stencils” for 4 of the six sides in my vinyl cutting program. I made one side uppercase, one side lowercase, one side cursive, and one side numbers and symbols. It was quick and easy to stick the stencils and paint over them with a small brush.

Vinyl Stencils for DIY Alphabet Blocks

Vinyl Stencils for DIY Alphabet Blocks

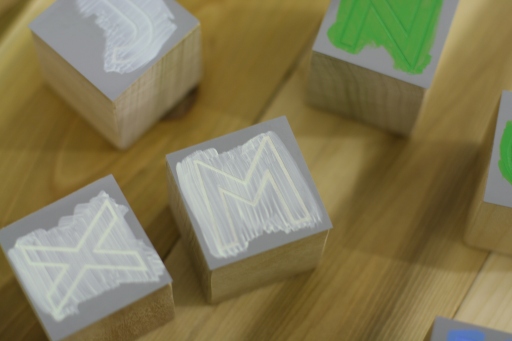
At first I stuck all of the stencils, painted all of the blocks, and then removed all of the stencils, but I found that the vinyl wanted to splinter the wood on some of the blocks – especially after the paint was dry – so I started pulling them off as I went. I loved the finished product!

DIY Painted Alphabet Blocks

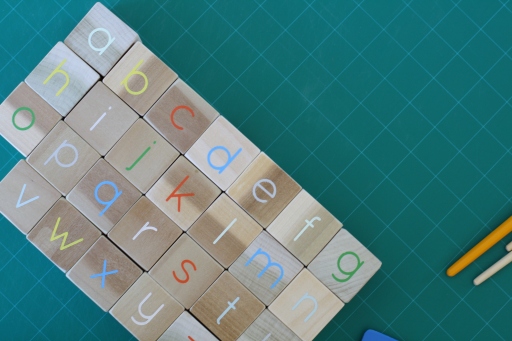
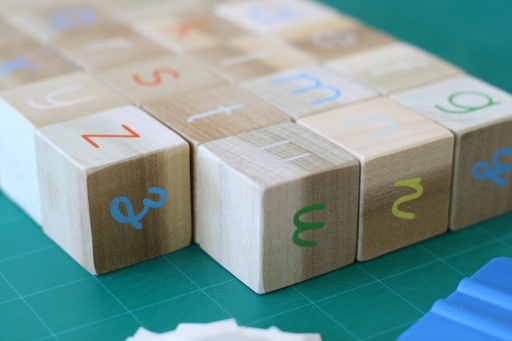
For the remaining two sides, I wanted to divide them in half and paint each half in different colors. That way you could use the blocks almost like a puzzle or to try to make a long chain of colors. For this step, I just cut lengths of frog tape and divided each side in half.

Using Frog tape for DIY Alphabet Blocks
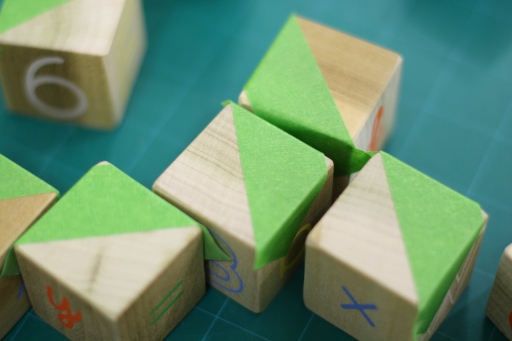
I carefully painted up to the edges because I didn’t feel like taping them off + they were rounded over.

DIY Painted Alphabet Blocks
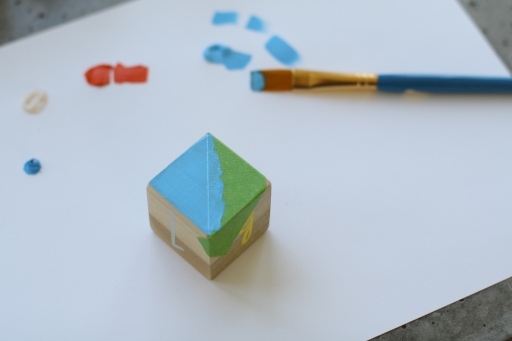
About 10 hours (spread over 3 days) later, I had finally finished the painting on all 6 sides of the blocks.

DIY Painted Alphabet Blocks : JabaayAve

DIY Painted Alphabet Blocks

Time to seal them. I used the same water-based polyurethane as we used on the floor in the loft. I did a bunch of research and couldn’t find any info stating it wasn’t safe, but any food-grade sealant or Safecoat Acrylacq would work as well if you are concerned.

DIY Painted Alphabet Blocks

This was my least favorite step. After two coats, I gave them a quick sand with a scotch brite pad and put on the final – third – coat. And there you have it! I’m delivering them Monday, so hopefully I can find a cute basket to put them in tomorrow.
DIY Painted Alphabet Blocks : JabaayAve

Out With The Old & In With The New

Finally some progress pictures for you! As soon as we got our garage permit, Jerm was dying to get started. The reason we were in such a rush is because it took forever to get our permit (until November 18th to be exact) and winter was quickly approaching.

Let’s have one last look shall we?

Before Garage

The very next day, Jerm was out there after work with two friends getting ready to knock it down and haul it out. The next step was to rent a jackhammer and break up the old slab. This sounded like an easy task since the slab didn’t seem to be reinforced with rebar or mesh (it was cracked all over), but much to our surprise, we found another much harder, reinforced slab under the first one. The jackhammer wasn’t even being very effective so we soon had an army of sledgehammers in our backyard chipping off tiny little bits until it was finally gone. The whole process took much longer than we thought.

Prepping for Slab 2
Because Jerm and I both work, we had to do a lot of our garage work at night after our day jobs. Thankfully, we had very understanding neighbors. Instead of complaining or calling the cops on us, they came outside and offered us the use of their garage lights and set up portable lights for us. We are so blessed to have them.

Prepping the forms at night
Anyway, after finally getting the slab up, our next step was to prep the space, dig footings, and put up forms for our new slab. Jerm’s family has and old Allis-Chalmers tractor that made easy work of moving some of the larger rocks around. We also used a laser level to make sure our forms were level and to make sure that our stone “foundation” for under the slab was level. Looking back on all of this, I picture those couple weeks as the most labor intensive work we’ve ever done. There was a lot of digging, rock moving, and working late into the night, but for once we got lucky and the snow held out on us.

After the ground was prepped and the forms were up, it was time to get ready to pour the slab. This is one of the few things we didn’t do ourselves because we didn’t want to mess up thousands of dollars of concrete. We hired a local family owned company, and they did gorgeous work. One thing we did to keep our cost down was to purchase all materials and do all of the prep work ourselves (like rebar, mesh, and visqueen). Jerm also wanted in-floor heat, so we ran about 400 feet of pex flexible tubing throughout the shop side and zip stripped it to the mesh. He has big plans for that in the future, but for now, it is all in place and ready to go. Because we did pour in colder weather, we had to keep the slab warm with tarp “blankets” for about a week.

Slab in Progress
Finally, it was time to start building, and I got a nice surprise upon coming home from work one Saturday—the first two walls were up! In case you are wondering, we bought all of our wood at a local lumberyard called State lumber. Smaller, local businesses are often more reasonable than you would think and we got better quality wood delivered right to our house (vs. picking through all of the warped boards at a home center).

First Load of Wood
First two walls going up
Once the building started, it went much quicker than I thought. Pretty soon we had more walls + our metal beam up to support the loft. We got lucky and found the perfect size beam behind a friends’ barn, so that saved a few hundred dollars.  Once the main floor was framed and partially sheathed, we started working on framing the loft, dormers, and roofline. We are truly grateful to all of our friends that came out to help us night after night. We couldn’t have done it without them.

Center wall up and Steel Beam in Place
Sheathing Started on Parking Side
The most challenging part of the framing was getting the huge ridge beams for the roof up into place. For the second beam, Jerm had to get creative and use a hoist to lift the beam up and into place.

Jerms Method of Lifting the Ridge Beam
New Years Eve was spent sheathing the rest of the roof, and finally, three days before the first snow on January 6, we had a roof.

Roof is done
Roofing was the only other thing we didn’t do ourselves. For one, we were in a hurry to beat the snow and couldn’t have done it as fast, and for two, Jerm didn’t like the idea of being up on such a steep roof. We hired a guy from our church, and they did a great job for us. We chose a 30 year architectural style shingle in “weathered wood” that he supplied.

Whew… That covered a lot of ground in one post. Next up, Jerm goes crazy and spends all of our money on insulation… Just kidding, but he did really prioritize the insulation in our garage.

Getting a Variance

In my last garage post, I shared some of what we went through to get our garage building permit. After several months of back and forth, we were finally able to convince our town that we knew what we were doing and were following all of their rules. BUT… they still decided to make us get a variance, because that was the standard set in the past when someone else wanted to build a large garage.

The variance process meant more time and more money. We had to resubmit two blueprint sized copies of our plans (not cheap to print) along with a $100 check for who knows what. Our “hearing” was set for a Thursday night, and we were the last on the agenda. Basically, we had to present our plans before a panel of 7 board members, and they would vote on whether or not to allow us to proceed in getting a permit. After watching the three people ahead us get voted down for various business ventures (things like a school in an industrial park…?), things were not looking promising. I feel like all of the board members secretly wanted to be judges in court because the procedures and formalities reminded me a lot of when I was on jury duty for a case. It was almost comical. When it was our turn, Jerm went forward and presented the plans. He told them what we wanted to do, and why we wanted to build a garage that large—I think his speech lasted all of about a minute. He is a man of few words when it comes to public speaking like that.

After he was done, the head of the building department spoke up and started praising Jerm’s resourcefulness to all of the board members. He also told them how much he admires what we are doing and the dreams we have for the garage. It was really nice to hear someone that understood us, and I think he really helped defend our case. I was definitely having a proud wife moment tearing up in the back row listening to him praise Jerm. After a few questions, they unanimously voted to allow us to move forward. We celebrated with chipotle! But we weren’t home free just yet.

After we won that battle, they still would not approve our plans without a licensed architect’s stamp on them. I don’t think they are used to homeowners drawing up their own blueprints, so they wanted another opinion to make sure everything was structurally sound. What did that mean for us? More time and more money… I was beginning to sense a theme.

Architect Stamp

Luckily, our local lumber yard gave us the name and number of an architect that lived a few blocks from us. He invited us to come over that same night so we could go over the plans together. As it turned out, he is into auto racing just like we are, so we had a lot in common. I think the majority of that first meeting was spent talking cars rather than garage. He gave Jerm a few changes to make to the way things were drawn on the blueprints, but overall our initial plans were just fine. The next day we went back with our changes and he stamped the drawings for us. We were very lucky to have it done so quickly and I think we only paid about $300 – way less than if we would have gone through somewhere else.

With our stamped drawings in hand, we went to finish applying for the building permit. But, it turned out that our county demo permit had expired in the time it took to get the variance and the drawings stamped. Guess what that meant! Yup… we had to shell out another $200 to get the demo permit re-issued. Very frustrating, but by that point we just wanted to start on our garage.

After getting that straightened out, we finally were granted this very coveted piece of paper—our building permit.

Building Pemit

We wasted no time in demoing our current garage and getting to work on the new one. We were both so glad when this permit process was over and that we didn’t have to compromise what we wanted in order to build it.

Asking Permission

Did you know that the only thing harder than building a garage is getting permission to build said garage? Yeah, we didn’t either. This step in our garage-building journey took us six months and had us jumping through a lot of hoops. Every town and state will be different, but I’m sharing what we learned in hopes that it might help someone else—or at least give you a bit of a laugh at some of the ridiculousness we went through.

Our first step was to check with our town to see what was required to begin. They told us that we needed to start by applying for a county demo permit, then apply for a town demo permit, and finally apply for the building permit. The catch was that we couldn’t demo anything until we also had the building permit because they don’t want people just going around demoing things and not replacing them with anything. Makes sense I guess. I also wondered why we had to apply for two different demo permits, but I learned that the reason had to do with property taxes. If we didn’t get a county demo permit and built a new garage, we could be charged property tax on both our old and new garage since there wouldn’t be any record of the demo.

The first bit of confusion came from the county demo permit. Our town had copies of the application, so we had filled one out and mailed it in. Rejected! Turns out that we also needed to include a $200 check and a full asbestos inspection report completed by a licensed company.  We also had an outdated application.

Rejection Notice
Nowhere on the application itself did it say this. Back to square one. I found a link on our state’s environmental health department site that listed all of the licensed inspectors, so I started calling around. Some were very expensive, so it is a good idea to price this out. I was able to find someone local that only charged $150 for the inspection plus $50 for the report.

The inspector came out on a Monday and I was able to pick up the report on Wednesday. Since their office was close to my work, I left in the afternoon to pick it up. For some reason the storefront of the inspector’s office was completely covered with newspaper so you couldn’t see in from the street, and I had to enter through the alley entrance. I was a bit creeped out since I was alone, so before I went in, I opened my little utility knife and kept it in my hand in my pocket. It all turned out fine, and I felt a little silly afterwards. The things we do for asbestos reports… But seriously, if no one knew where I was, I wouldn’t have gone in. You don’t want to mess around in a situation that makes you uncomfortable.

Asbestos Inspection Report
Thankfully we were in the clear for asbestos, so we were approved for our demo permit from the county.

Now for the hard part: our town. Even though our town doesn’t have a whole lot of new construction going on, we have a large building and code enforcement department and they can be sticklers. When we came to them with our original application, they sent us home with a long list of things they were concerned about.  Jerm is apparently very passionate about exterior man doors.

Garage Checklist

Some of their main concerns were:

  1. The size – This was their biggest concern. When we designed the garage, we made sure that it wouldn’t be taller than our house, because that is one of the local codes. Our garage is set up with a two car parking section with a loft over it, and an open shop side for Jerm’s lift. Because of the square footage, they wanted to call it a four car garage, and four car garages are not allowed in our town. We found a number of pre-made garage plans online of a similar dimension that were labeled as three-car garages, so we presented those to them to plead our case. They finally agreed that ours was also a three car.
  2. The portion of our lot that would be covered by impervious area – Our town has a code that no more than 50% of your lot can be impervious. If we included the garage, the driveway, and the house, we would have been well over 70%.  We obviously couldn’t change our house, and we were unwilling to compromise on garage size, so we looked to the driveway to gain that space back. Jerm found permeable pavers as an option and started doing research and getting quotes. We learned that they are considered permeable because they are installed with larger gaps in between to let just as much water flow through as just plain dirt or grass would.  The problem was the price. From the two initial quotes Jerm got, it looked like we would have to drop $15,000+ on pavers… No thanks. On one of our Menards wandering trips, we stumbled on a similarly rated permeable brick paver for only $0.69 each. Our town ultimately decided to allow it, so we were able to get around that rule by being creative.
  3. The comparables – In the past, two other people that wanted to build large garages in town had to get variances, so to be fair to them, we would have to get a variance as well. I don’t think they have too many people that draw up their own plans, so I think they were worried that we hadn’t thought it through enough. They just don’t know Jerm, I guess, because they would be hard pressed to find a better designed garage in the town.

I guess I would rather have them be picky rather than allow anything to be built in town, but it sure was frustrating to go through this when all we wanted to do was start our garage before it got too cold out.

Have you ever dealt with your town’s building department before? Thankfully we had a much easier experience when it came time for inspections.

Planning For a New Garage

 When we bought our house, we knew that someday we would be replacing our garage. It wasn’t a matter of if… it was more a matter of when. Our little two-car garage would have served its purpose with some TLC, but we needed more space.

Before Garage
Our reasoning was:

  1. Our house is small and we have big hobbies (like cars, airplanes, and vinyl cutting). Currently I cut my vinyl in our little bedroom, and Jerm works on cars in his parent’s garage three doors down. He wanted a space of his own, and I wanted a designated space for my vinyl.
  2. In addition to big hobbies, we have big dreams! Jerm’s dream is to get his pilot’s license and build his own airplane, so we needed a space for him to be able to accomplish that.
  3. We know we are going to stay in our house for a while, so it was worth it to invest the money into a new garage rather than putting it into the old garage.

We had talked about a new garage on and off for a year and a half before it became a serious option. We wanted a large garage but were unwilling to take out a construction loan to build it. So, we saved up until we had enough money to get started + a nice cushion for emergencies. Since Jerm could do almost all of the work himself, we knew we would save a ton of money on labor. It also helped to know that we would be spending the money gradually rather than in one lump sum—however, there were still some big purchases that would need to be taken into account like lumber, the concrete slab, the siding, and the roof.  I wouldn’t say we made a budget, but we did spend a lot of time wandering around home centers, getting a feel for how much stuff cost.

Jerm started drawing up plans for the new garage about a year before we broke ground. I’m so proud of all of the work he put into it, and he seriously thought every single thing—I mean how many people have radiant floor heat in their garage? He used programs like CAD and Solid Works to draw up the blueprints. Almost every night I would find him sitting at the computer in his glasses, working on the drawings—often times with Zu laying next to him. Because the plans were drawn by him and not just off-the-shelf garage plans, they took into account all of our needs and wants for the space.

IMG_8364
After spending about 5 months on planning, the real fun (not!) began… trying to get permission to build what we wanted.